

Description
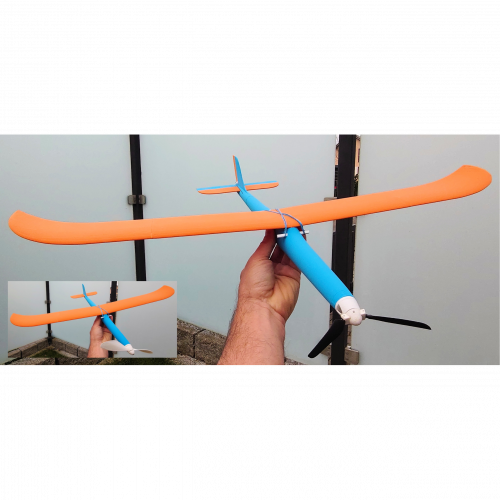
Airy-71
Version 2 of a lightweight 3D printable multi-purpose airplane.
User Guide
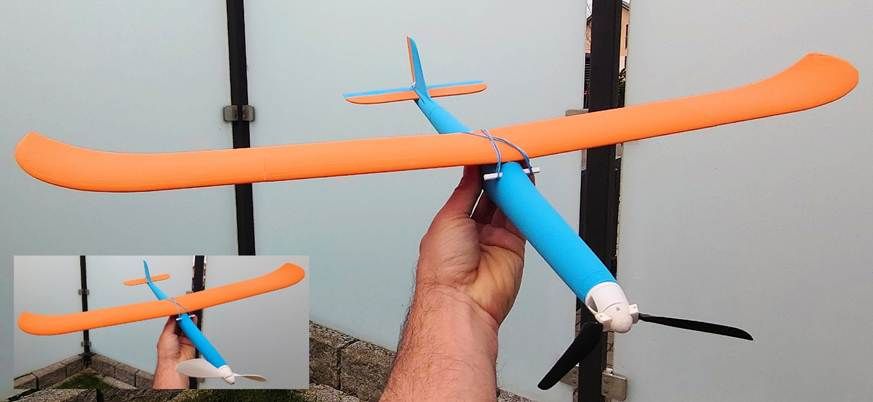
Figure 1: 3D-printed Airy-71 Version 2
|
Parameter |
Airy-71 |
|
Wingspan: |
706 mm |
|
Length: |
499 mm |
|
Wing airfoil: |
S4083 |
|
Weight (radio-control / rubber-band / glider): |
90 / 80 / 70 g |
|
Wing area: |
6.2 dm2 |
|
Wing load (radio-control / rubber-band / glider): |
14.5 / 12.9 / 11.3 g/dm2 |
Available here: https://cults3d.com/en/users/3dprcfun/
https://rc3dmarket.com/3dprcfun
Content
What you get
This is the perfect airplane to inspire your children of the fascinating world of model aircraft sports. Version 2 is a "3-in-1" with triple fun. It can be used as:
· glider
· rubber-band motor model
· radio-controlled model (with brushless motor)
Changing between rubber-band motor and glider model operation is possible within seconds. Most components are designed for printing with Light-Weight (LW) PLA. The propeller and some other small parts are printed in PLA to withstand stronger forces and to obtain the desired center of gravity position.
Since almost all parts are 3D printable, this plane can be reproduced after a crash at very low cost. I spent considerable amount of time with prototype testing and refinement to improve printability, flight characteristics, and rigidity. The latter is essential since harder landings are impossible to avoid for the rubber-band motor and glider models. Flight videos can be found on my YouTube channel.
3D print files
The package includes a complete set of STL files, a set of PrusaSlicerproject files, and the hereof generated gcode. PrusaSlicer is a powerful open-source software that can be used for free. The project files were created with version 2.8.1 and contain all detailed print settings required to optimally print each airplane part.
|
STL |
STL stands for Standard Tessellation Language, a file format that describes the surface geometry of a three-dimensional object. High resolution STL files are included for all printable parts. |
|
Project files |
Multiple STL files can be combined into a single project file
(3mf) and "print job” (gcode). Specific slicer settings can be applied to e.g.,
increase the stability of a certain part area or improve the printability of an
area with a large overhang angle. |
|
Gcode |
For the PLA project file and each LW-PLA printable part, gcode files are provided to minimize your preparation time. Please note that these gcode files were generated for the Prusa i3 MK3S. For many 3D printers and filaments, the gcode should just work fine. If you experience issues with the print quality, just modify the slicer parameters in the project file to create the optimal gcode for your printer. |
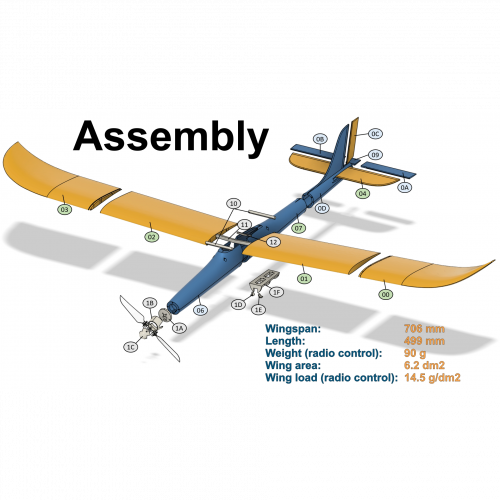
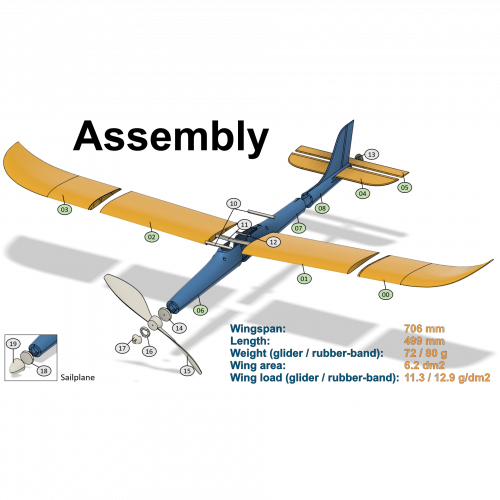
Figure 2 and Figure 3 provide an overview of the required 3D printable parts. The color code of the index numbers shows to which project file the part belongs.
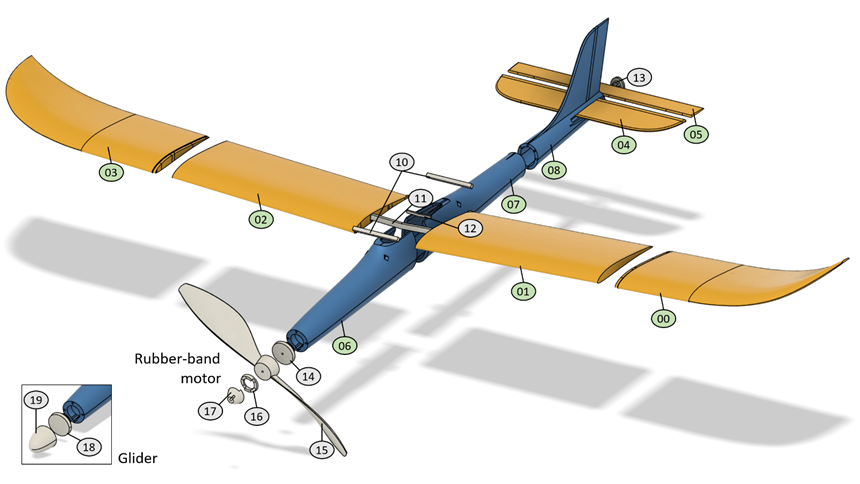
Figure 2: Exploded view with labeled parts for the rubber-band motor and glider model
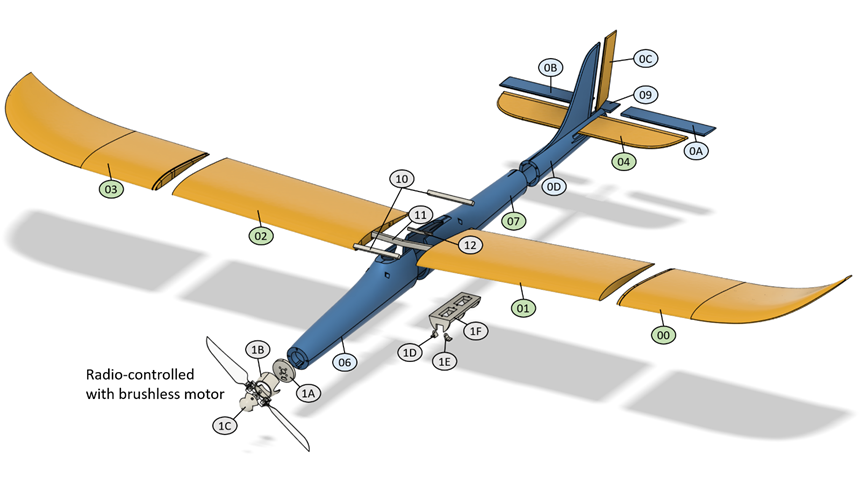
Figure 3: Exploded view with labeled parts for the radio-controlled model
|
Project (.3mf) |
STL name |
Index |
Weight |
Comment |
|
LW-PLA
weight: 64g |
wing-2-l wing-1-l wing-1-r wing-2-r horistab-front horistab-back fuselage-1 fuselage-2 fuselage-3 |
00 01 02 03 04 05 06 07 08 |
8.0g 9.1g 9.1g 8.0g 2.5g 1.4g 16.1g 5.9g 3.9g |
extrusion mult.: 0.40; nozzle temp.: 250°C extrusion mult.: 0.40; nozzle temp.: 250°C extrusion mult.: 0.40; nozzle temp.: 250°C extrusion mult.: 0.40; nozzle temp.: 250°C extrusion mult.: 0.37; nozzle temp.: 250°C extrusion mult.: 0.37; nozzle temp.: 250°C extrusion mult.: 0.45; nozzle temp.: 235°C extrusion mult.: 0.37; nozzle temp.: 250°C extrusion mult.: 0.37; nozzle temp.: 250°C |
|
LW-PLA RC parts
weight: 12.5g |
horistab-back-rc elevator-rc-left elevator-rc-right rudder-rc fuselage-1 fuselage-3-rc |
09 0A 0B 0C 06 0D |
0.2g 0.7g 0.7g 0.5g 6.8g 3.6g |
extrusion mult.: 0.37; nozzle temp.: 250°C extrusion mult.: 0.37; nozzle temp.: 250°C extrusion mult.: 0.37; nozzle temp.: 250°C extrusion mult.: 0.37; nozzle temp.: 250°C extrusion mult.: 0.40; nozzle temp.: 250°C extrusion mult.: 0.37; nozzle temp.: 250°C |
|
PLA
time: 3h 36m, weight: 27g |
rod (2x) wing-connector-f. wing-connector-b. rubber-end-holder fuselage-connector propeller locking-ring spinner nose-part1 nose-part2 motor-holder motor-cover spinner horn-rudder horn-elevator servo-holder |
10 11 12 13 14 15 16 17 18 19 1A 1B 1C 1D 1E 1F |
1.0g 0.6g 0.2g 0.6g 2.1g 8.9g 0.3g 0.9g 2.2g 5.5g 1.1g 0.7g 0.5g 0.1g 0.1g 2.1g |
common common common rubber-band motor rubber-band motor rubber-band motor rubber-band motor rubber-band motor glider nose connector (no drilling) glider fuselage nose rc component rc component rc component rc component rc component rc component |


Notes:
The red-colored text highlights print settings which deviate from the default
settings to obtain the center of gravity as shown in Figure 5.
If you want to use a different slicer software, make sure to check and reapply
all part-dependent print settings provided in the PrusaSlicer project files.
Otherwise, some parts may not print as desired.
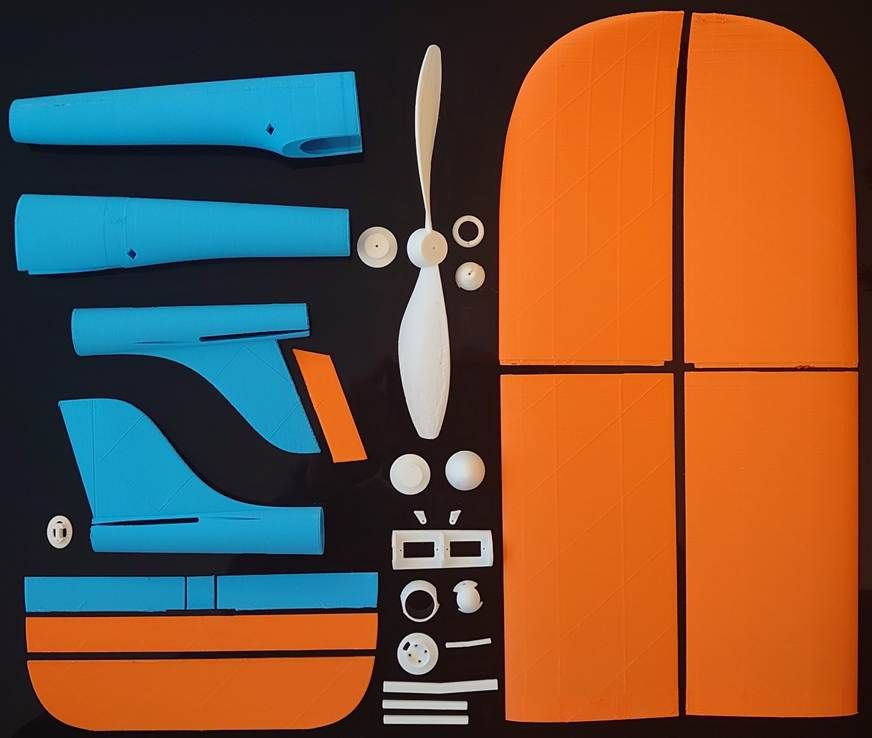
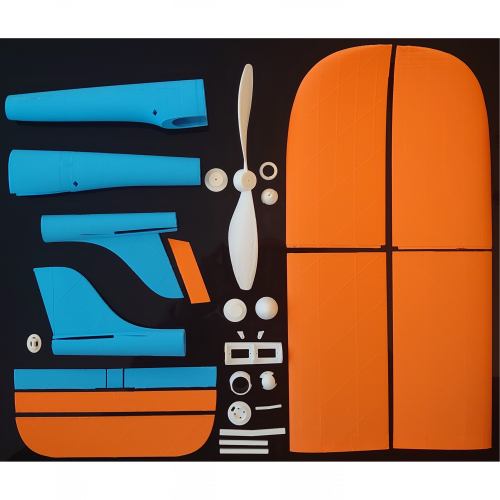
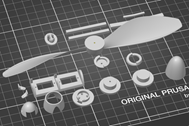
Figure 4: All printable parts.
What you need
3D printer specification
All STL files have been successfully tested with my Prusa i3 MK3S.
|
3D print volume
|
Minimum requirement for single STL file (ensures printability of
all plane parts): X=145mm; Y=145mm; Z=180mm. |
|
Nozzle diameter |
0.4mm |
|
Filament support |
PLA / LW-PLA |
Required materials
Almost all plane parts are printable except for the rubber bands and some metal parts.
|
Common |
Filament |
Light-Weight PLA: <80g (e.g., 3DLabPrint PolyLight 1.0) PLA: <30g (e.g., Overture PLA Professional) |
|
Carbon rods |
4pcs: Ø 1.0mm, length 470mm |
|
|
Rubber band |
2pcs to attach the wing to the fuselage |
|
|
Basic tools |
Cutter knife, file, pliers, drilling machine and drill Ø 1.6mm |
|
|
CA glue |
Medium viscosity e.g., Hobbyking Super Glue CA (50g / 1.7oz) Medium |
|
|
CA accelerator |
Recommended e.g., Hobbyking Insta-Set CA Accelerator 2. Oz |
|
|
Rubber-band |
Spring steel wires |
1pc: Ø 1.5mm, length 100mm (to connect propeller with rubber band) |
|
Metal washer |
2pcs: inner Ø ≈ 1.5-2mm, outer Ø ≈ 5-6mm, thickness ≈ 0.3-0.8mm |
|
|
Metal spring |
Metal spring from a ballpen |
|
|
Rubber band |
Rubber band for the motor e.g., Flight-Depot Sport Gummi 4.8 X 2000mm |
|
|
Radio-controlled You may have different requirements depending on your radio. |
Spring steel wires |
2pcs: Ø 0.8mm, length 320mm |
|
Hinges |
A few centimeters of gift ribbon with 8mm width |
|
|
Screws |
4pcs: M1.4, length 4mm (or similar for servo attachment) |
|
|
Motor |
Micro 1104 HM Brushless Motor 4300KV (screws included), AliExpress |
|
|
Folding propeller |
5.5x3.3 Mini Folding Propeller, AliExpress |
|
|
ESC |
1S 4A ESC 3.7V-6V Micro Brushless Motor Driver Board, AliExpress |
|
|
LiPo |
1S 380mAh LiPo battery, AliExpress |
|
|
Cables/ connectors |
JST PH2.0 2pin cable connector male (connect LiPo with ESC), AliExpress JST SH1.0 3pin cable connector female (connect ESC with receiver), AliExpress |
|
|
Servo |
2pcs: 2g Micro Digital Coreless Servo, AliExpress |
|
|
Receiver |
Graupner GR-12SH+ HoTT, robbe |
Assembly
Main video assembly guide
This assembly guide provides all required hints for a successful assembly of the Airy-7.
Chapters:
00:00 > Intro
00:19 > Wing
03:38 > Fuselage for
rubber-band motor and glider
06:43 > Rubber-band engine
& glider nose
10:20 > Fuselage including
servo installation
18:57 > Brushless motor
21:03 > Remaining radio control
Pre-flight setting & check
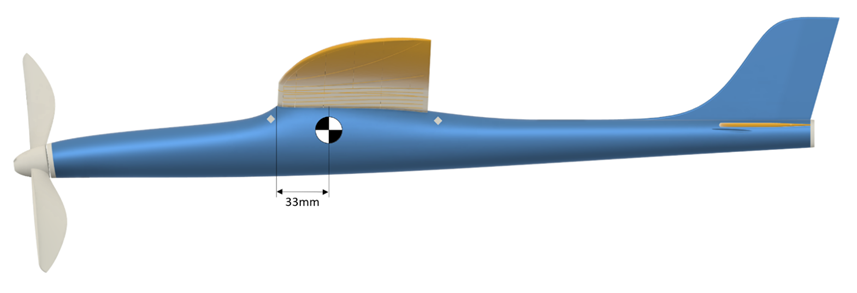
Figure 5: Center of gravity (CoG)
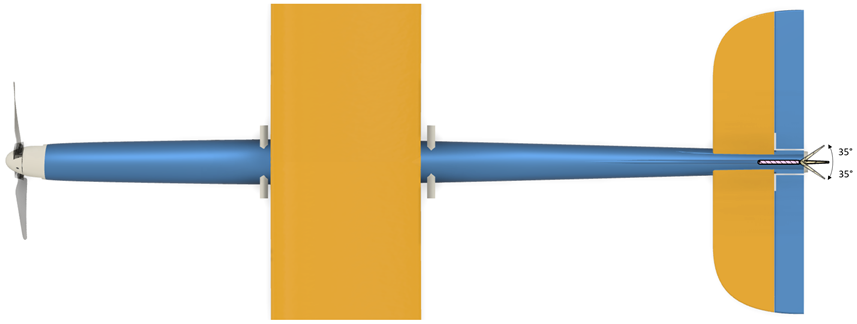
Figure 6: Rudder deflection angles
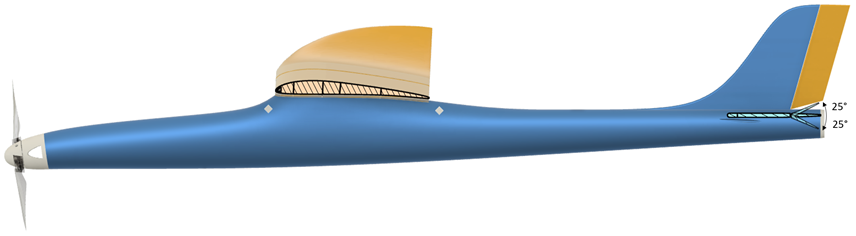
Figure 7: Elevator deflection angles
Change log
Version 2
· Added radio-controlled version.
· Reworked fuselage part connection and added 1mm carbon rods to further improve robustness.
· Optimized printability and weight distribution.
Video
Shop Policies
Delivery Policy
Digital files for own printing will be made available for download (no shipping costs).
Printed parts:
To ensure proper delivery and happy customers, products will be shipped with DHL, which is part of the world's leading logistics company DHL Group.
Refund policy: 30 days return. Buyer pays return shipping.
Delivery is currently available in the following regions:
· Germany
· Great Britain and Switzerland
· All other EU countries
· Most other countries of Europe
The shipping costs depend on the delivery destination. For countries other than Germany, you may select between two options:
· Excluding insurance and tracking. No reimbursement from DHL or the seller if the package gets damaged or lost during delivery. -> less expensive
· Including insurance and tracking. Reimbursement from DHL if the package gets damaged or lost during delivery. -> more expensive
Contact: 3dprcfun@gmx.net
Refund Policy
30 days return for physical products (printed parts). Buyer pays return shipping.
Rating & Reviews
Based on 0 Ratings
- 5 Star
- 4 Star
- 3 Star
- 2 Star
- 1 Star