

Seller
L3D
Description
3D MODEL DESCRIPTION
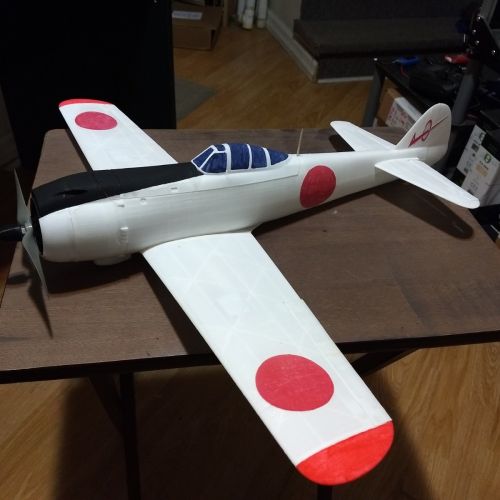
Designed by Nakajima as the Army Type 4 Fighter, the Ki-84 is generally considered the best Japanese fighter to operate in large numbers during the conflict, with high speed, excellent maneuverability, and formidable firepower - up to two 30 mm and two 20 mm cannon. Almost 3,500 were built.
https://en.wikipedia.org/wiki/Nakajima_Ki-84
This 600mm wingspan version is powered by a BR2205 2300Kv or a low cost QM2804 2300Kv or similar electric out-runner and is designed to be printed in LW-PLA, with a few key parts in PLA, like the motor mount, propeller blades and hub.
Included with this file:
• Factory files for Simplify3D
• STL files for all components
• Assembly manual and user guide
• Sample markings
UPDATES
2021-09-18: BR2205 + 5x5 e-prop + 3S 550mAh is the best combo; lesser torque side effect, easy hand-launch, better than 1:1 power to weight ratio.
2021-06-08: v1.5
• All the key parts now printing in a continuous motion to reduce/eliminate those LW-PLA twisters: F1, F2, F3, Wings, Stab, Hatch.
• Factory files improved; end script, start point, firmware type updated/corrected
• 2mm round toothpicks can be added to stiffen the stab
• Magnets to retain hatch increased to 6x2mm
• Stiffener added to hatch back magnet
• Trailing edge wing fillets added
2021-05-19: CG at 31mm on flying prototype
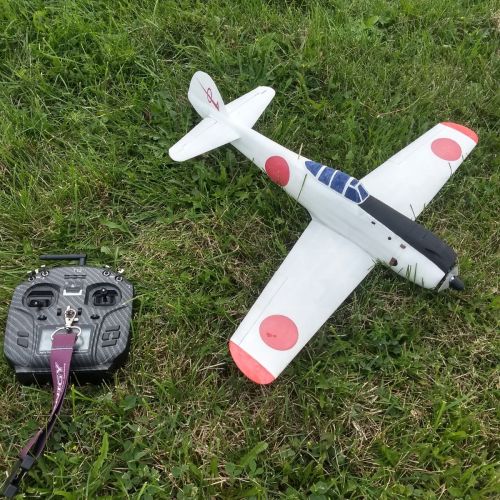
2021-05-16: Successful test flight! Needs stronger magnets to hold down the hatch. Fast on the BR2205 / 2S 1300mAh.
2021-01-29: New thinner Propeller Hub
2021-02-01: Updated Fuse3c with a thinner central rib to match the other internal formers and fixed the location of the hole through Fuse3c for the elevator joiner.
2021-02-05: Updated F3d.stl with a better front end, making for a cleaner print.
FLIGHT VIDEO:
2021-05-18: 1st flight: https://youtu.be/05ZlJVCW-fM 2nd flight: https://youtu.be/vHlzutkAZbs
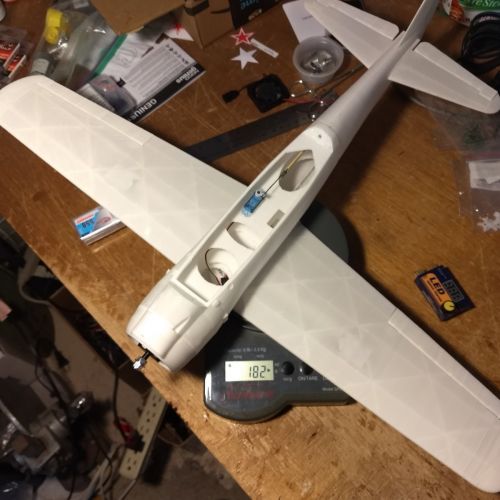
Print time: 85hrs
Print weight: 165g
RTF AUW: 295g with 3x3.7g servos, BR2205, 3S 550mAh
REQUIRED COMPONENTS:
X1 2205 2300Kv Motor (or similar)
X1 20AMP ESC
X1 1300MAH 2S LIPO (or similar), 59g
X3 3.7G Micro Servo (X4 if installing working rudder)
X1 4ch+ Micro Receiver
X1 Bamboo Skewers (X2 if installing working rudder)
X2 6x2mm Magnets (cylinder shape)
CA Hinge Sheet or X8 Micro Hinges
Velcro (sticky back)
X4 M2x10mm screws.
OPTIONS
- Parts are provided to install a functional rudder.
- A 4 bladed hub can be used instead of the 3 bladed version for historical accuracy.
PRINT VOLUME:
200x200x250
300x300x400
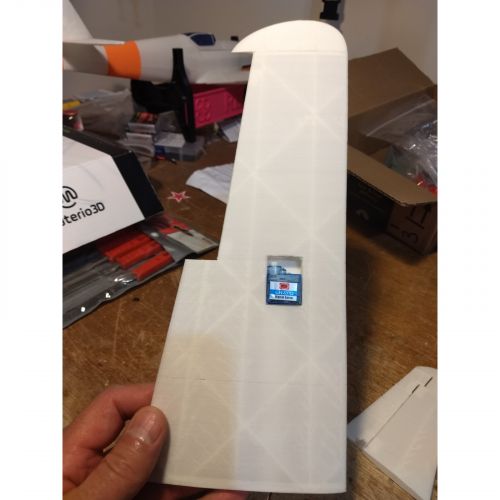
All the parts will fit in a 200x200x200 printer, except the F2 fuselage section that is 240mm high and wing panels are 248mm. Best to print 1 part at a time.
For any questions and assistance please use the RC-Group thread:
https://www.rcgroups.com/forums/showthread.php?3785985-Ki-84-Hayate-Frank-600mm-LW-PLA
PARTS LINKS
X1 2205 2300KV Brushless Out-Runner Motor
https://www.banggood.com/Racerstar-Racing-Edition-2205-BR2205-2300KV-2-4S-Brushless-Motor-CWCCW-Green-For-QAV250-ZMR250-260-p-1088307.html
Or QM2804 2204 2300KV
https://www.aliexpress.com/item/4000002657801.html
X1 20AMP ESC
https://fr.aliexpress.com/item/4000078165193.html
X1 1300MAH 2S LIPO
https://www.banggood.com/2-PCS-ZOP-Power-7_4V-1300mah-25C-2S-Lipo-Battery-JST-Plug-p-1232988.html
or
X1 950MAH 2S LIPO
https://www.aliexpress.com/item/32907577121.html
X3/4 3.7G Micro Servo
https://www.aliexpress.com/item/32965734270.html
X1 Micro Receiver
I use this low cost 4ch FrSky compatible receiver:
https://www.banggood.com/2_4G-4CH-Mini-Frsky-D8-Compatible-Receiver-With-PWM-Output-p-1143300.html
X2 Bamboo Food Skewers (3mm diameter, local Dollar Store)
X2 6x2mm Magnets (cylinder)
https://fr.aliexpress.com/item/1005002408460344.html
CA Hinge Sheet
https://www.banggood.com/RJXHOBBY-CA-Hinge-Sheet-180mmx140mmx0_3mm-Maintenance-Board-Repairing-Tool-p-1239531.html
X8 Micro Hinges
https://hobbyking.com/en_us/super-light-pivot-round-hinges-d2xw8xl24mm-12pcs.html
VELCRO – (local hardware store)
Velcro strip with adhesive back.
M2 x10mm screws
https://www.ebay.com.au/itm/400PCS-M2-M2-6-Pan-Head-Self-Tapping-Screws-Assorted-Kit-Stainless-Steel-Black/254399626404
3D PRINTING SETTINGS
LW-PLA parts;
• print head = 250 deg c
• print bed = 60 deg c
Cooling fan to be run for each layer at 100%; I start around layer 4 for better adhesion to the bed.
The Wing panels are tall at 248.5m and printed in one piece without the wing tips; the wing extremities could end up wavy from wobbling during the print. This can be solved by printing the Braces with them.
Video
Rating & Reviews
Based on 0 Ratings
- 5 Star
- 4 Star
- 3 Star
- 2 Star
- 1 Star